Pages

Friday, November 14, 2014

Newest Pattern About to be Published: WHIRL AWAY

What are your thoughts on paper-piecing?

This pattern will be available next week.


Thursday, November 13, 2014

Blue Diamonds - Quilted, Bound, DONE!

On November 5, I shared a photo of  my Blue Diamonds quilt in pieces on my design wall:
At the time I was contemplating adding some other blocks of varying configurations, to show how a simple HST grouping can produce SO many cool designs, as borders.
I apologize for the yellow quality of these photos - I snapped them with my cell phone but I think you can see what I am talking about in them.
I really didn't like how the blocks
 took away from the simplicity and impact of the simple repeating diamond pattern on the quit top,
SO
they are now part of the backing:


This particular quilt is a sample for a class I will be teaching in January on Beginning Quilting.  What block could be more versatile yet basic to all quilting but the HST?  It teaches anyone the basics - stitching an even precise 1/4 inch seam, how to deal with bias, chain piecing, and the most fun - assembling into lots of patterns.
I have long decided I really do NOT like machine quilting on my domestic machine - it is just not smooth enough for me to really get into the thread play.  I am always yanking, stuffing, rolling, getting exasperated....    HOWEVER - in light of the fact that the students taking beginner quilting will be making a quilt START to FINISH it was important to show how it can be done.
As those of you who quilt on your domestic machine know there are a few ways to attack the undertaking.  My first decision was to decide how to baste the sandwich together - pin-basting or spray?  I opted for spray so I didn't have to stop and remove pins as I went.


It is not a large quilt (14 - four inch squares by 14 - four inch squares) so I laid it out on a hardwood floor outside my sewing space (lots of air/ventilation recommended) and taped (painters' tape) it securely to the floor. 


 It needs to be TAUT not STRETCHED.


The batting was roughly the same size as the backing, which I make a good 4-5 inches larger than the top all around.  I positioned it over the backing (which was face down).


I pulled half of it back, sprayed the backing, positioned the batting then did the same for the other half.  The process was then repeated with the actual top, face up.


Once I had the sandwich together I went to the machine and began the quilting!  I have discovered this awesome stitch which has a nice curve but is uniform and stitches up like a straight seam.


Here you can see I use my walking foot and how this stitch creates a nice undulating curve.


I always use needle stop down for pivoting at corners:


Again because of the poor color qulaity of the pics it is hard to see.  I chose a light seafoamy green for the light diamonds and a variegated green/aqua/turquoise for the dark diamond quilting:


 This shows the final effect of the stitch choice I made for the quilting:


 and here....


This is very hidden but I did manage to sew the corner under to have a nice DOUBLE quilt.  Sheesh!

Another reason I dislike machine quilting - the small space to maneuver in.
  I am very happy with the final product (even with all my complaining - LOL).  It is a quick pattern to stitch up.  A design wall is really helpful in laying out the pattern.

BACK VIEW (in natural light):


FRONT VIEW:

Wednesday, November 12, 2014

Pink Sun Rising Quilt-Along Part 2 Assembling the Blocks

SO!
Have you mastered the paper-piecing and assembled ALL(maybe many of) the arcs?
It isn't so bad once you get the hang of it - RIGHT??

The hardest part is DONE!

NOW -
attaching the inner curved piece and outer curved piece to the paper-pieced section is all the piecing work left to do.
Sewing curved pieces is not difficult - it just requires a little patience and prep work.

Copy the pattern for sections A & C onto freezer paper and cut out the shapes (the grey fabric with white polka dots represents the arcs you have just finished with the paper-pieced rays).  I am only showing sections B and C.


I find the most accurate method is to pin in the center of the 2 curves first,
then the outermost points,
then, depending on how big the curve is - pin at the half-way point between the 2 pins at the outer edge and the mid-point and either leave it be or keep pinning at midpoints, if necessary and as needed.
Fold the section right sides together to find the midpoint of each on the stitching line.


Right sides together match section C at the midpoint to the midpoint of section B.
Pin at the outer edge.


Wow - will this really sew together and lie flat??
YES IT WILL!


BUT it is going to look much worse....


Slowly stitch from edge to edge, easing as you go.  Be very careful NOT to stretch this bias edge as you proceed.


If all goes well - it will look something like this:


Opened up before pressing:


Oriented as in the block after pressing:


Wrong side:


SO!  It worked!  Not too difficult.  Now do the same attaching section A to this combined Section B&C.

This was probably a little easier using a single piece of fabric rather than the pieced arc section B you have with all the rays.  When piecing paper-pieced sections often you are told to leave the paper on while assembling everything.  Personally, with this pattern I felt like had much more flexibilty in piecing with the paper removed.  Try it both ways and see what works best for you.

This does bring us to the end of the piecing for this particular quilt.  The remaining blocks are simple squares.  
Lay out the entire pattern on a design wall then stitch the individual blocks in the rows together, then the rows to each other.

THIS, or something similar, is what you have created!
I am sure you noticed it is very easy to alter the pattern by moving the different blocks around to your liking.


PLEASE SHARE IF YOU FINISH A PINK SUN RISING QUIT TOP!!  
WE WOULD ALL LOVE TO SEE IT.


Wednesday, November 5, 2014

What's On My Design Wall Today!

Back in this post on half-square triangles I mentioned that this quilt top was being made for a class I will be teaching on beginning quilting.  I have pieced ALL the HSTs and am now contemplating how to finish it up.  I made some other blocks showing different pattern combinations that I debated using as a top & bottom border, but I am preferring the simple clean diamonds without distraction at this point.  
I think I have been staring at it too long - it is beginning to scintillate to me!!


So... I think I will incorporate the other blocks into the backing so they are apparent for beginning quilters to see the myriad of choices you can have with HSTs.
I need to get this sandwiched, 
quilted, 
bound 
& photographed 
by the end of next week to get it into the class info that my LQS puts out for the next session of classes. 

I really don't like the whole sandwiching process.  It is SO much easier to send it off to my wonderful long-armer - Jennifer,
  BUT 
this is a class about making a quilt START to FINISH.  
Hmm. 
SO not thrilled about this.

What is your preferred method of sandwiching?
Pins or spray baste?  


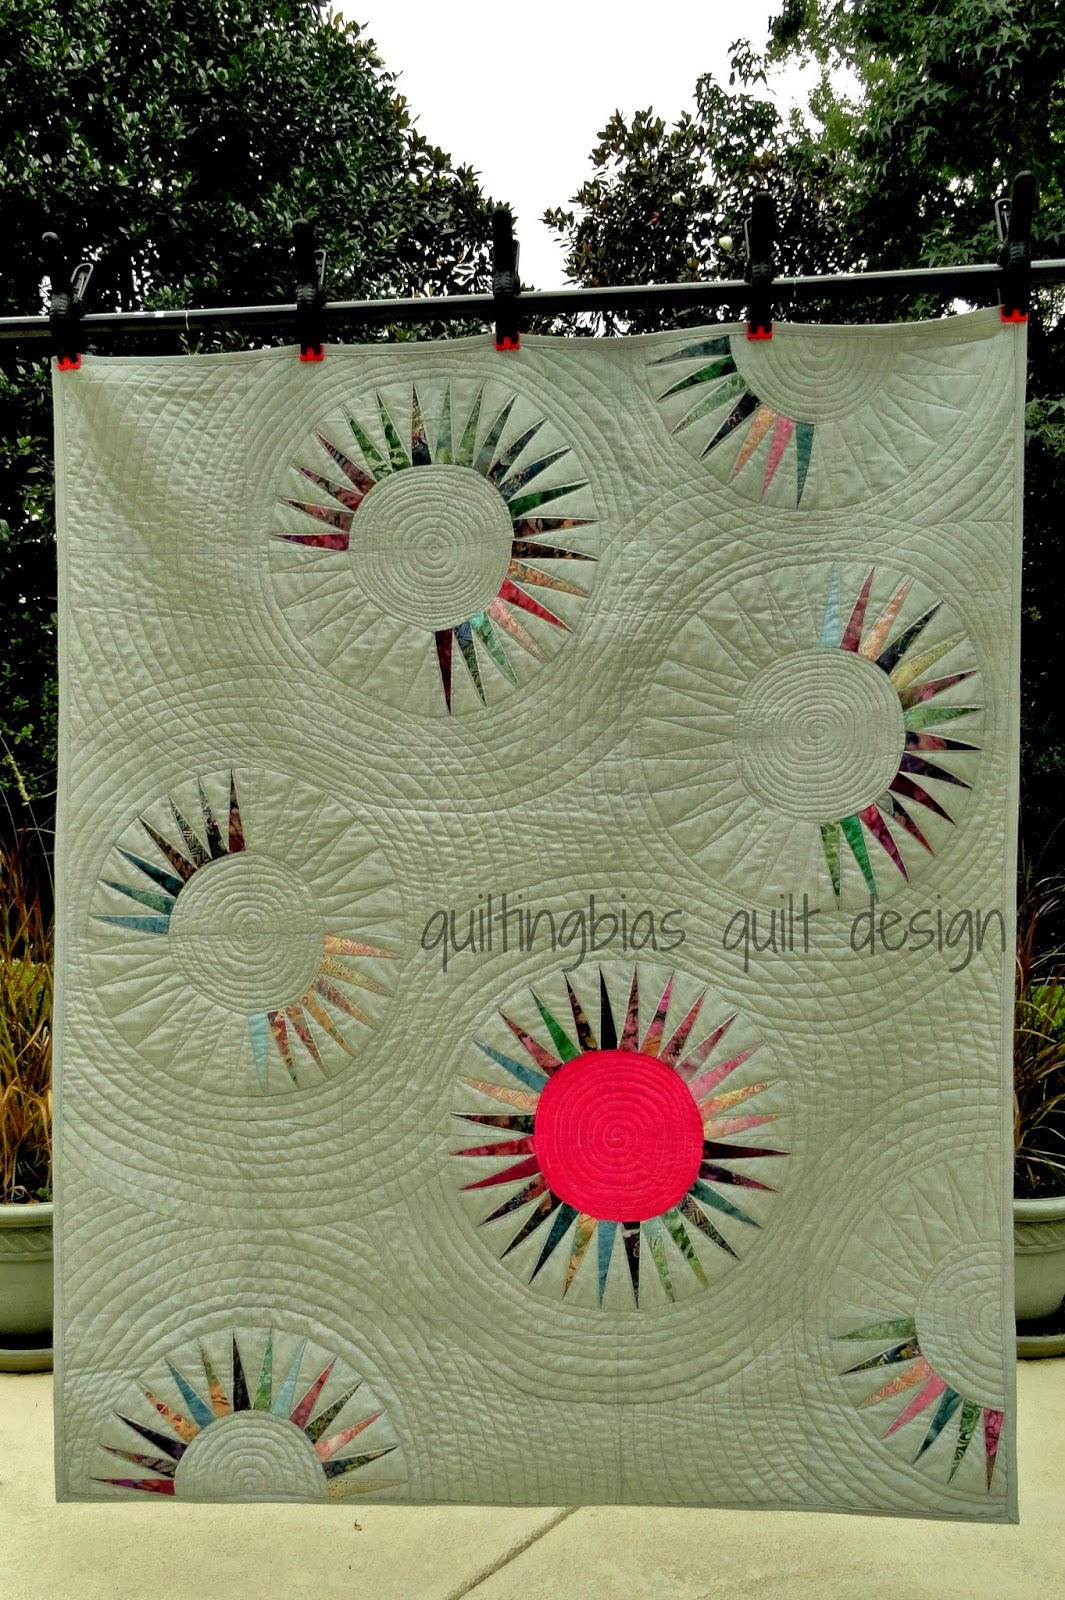
This is the last quilt I quilted on a domestic machine and it made me crazy moving it around and not being able to stay in the flow of my stitching.  


I know it is really hard to see the stitching but hopefully you get the idea!


Many people love to quilt on their domestic machines..  In our AMQG we are doing a BOM that has the option to quilt as you go (QAYG) which I am enjoying because of the ability to start and not stop until I am finished quilting a particular section in it's entirety.


Meanwhile I have begun another undertaking - a new quilt top with more CURVES!!  I have always loved circles and curves in quilts. I will be re-visiting sewing curves next week in the Pink Sun Rising Quilt-Along, part 2.
They bring a certain dynamism that cannot be achieved any other way.  They are really not that hard to sew if you take your time and pay attention.
I have taken the circles a little further than I intended -  as you can see I am auditioning a background fabric of polka dots as well.


These clamshells were cut very easily on an Accuquilt die cutter.  What a time-saver that is!

So what are you up to in your quilting adventures this week?

Linked up with Freshly Pieced!

Wednesday, October 29, 2014

Blogging - SO Much to Learn Part 2

This is EXACTLY what I mean about so much to learn.  Bear with me - I have to create a separate post for each submitted quilt to the Blogger's Quilt Festival.

You have to get beyond this post,

to post #3,

then post #4 

to 

POST #1 
from today
to understand what I am talking about!!

Are you still with me?

Sorry.

  Modern Geese

- Original Design entry #1

my original blog post about this quilt is here:
http://quiltingbias.blogspot.com/2014/08/what-goes-aroundwellyou-know.html


Blogging - SO Much to Learn - Part 3

Sometimes learning is ALL about fixing your errors and living with them!
Here is my submission #3 to the Blogger's Quilt Festival, 1 of 2 to the modern quilting
category.

PINK SUN RISING
my modern original version of a New York Beauty quilt

You can read all about this quilt here:
http://quiltingbias.blogspot.com/2014/09/gotta-do-it-my-way.html


http://amyscreativeside.com/2014/10/24/bloggers-quilt-festival-modern-quilts-2/

Blogging - SO MUCH To Learn - Part 4

In this FINAL installment of my submissions to the Blogger's Quilt Festival this is 
JAGGED EDGES
an original design.


Modern?  
By all means, 
BUT definitely an original design as evidenced by the number of HOURS I wasted  invested designing this pattern.
It is made up of only 2 different pieced blocks and created, for me, an edgy modern impactful design.  I designed this particular quilt with EQ7, compared to Modern Geese which I drew on graph paper then tried to retrofit it into software.  NOT an advisable approach, but, it did eventually work.


http://amyscreativeside.com/2014/10/24/bloggers-quilt-festival-fall-2014-edition/


BLOGGING - So Much To Learn!

Hi all!
This morning as I think about this blog and all of you who have chosen to spend your valuable time sharing with me what I am doing - I really am humbled.  

Thank you 
for being here 
and 
REALLY thank you 
for being an inspiration to me to keep exploring my creative side. 

 In my life that depended on my education I taught high school biology and chemistry, so working in this way with fabric and color feels truly indulgent.  I LOVE seeing what everyone else is up to and what keeps you inspired and creatively fueled.  We all know how easy it is to put this area of our life on the back burner while taking care of all those pesky day-to-day necessities.

I recently discovered the Blogger's Quilt Festival at Amy's Creative Side.  If you aren't aware of it - hop on over and have a look at all the creativity here!  

Maybe you have something you'd like to share as well!

I am going to enter quilts that you have seen before,
 if this isn't your first time here.  
Alas I have nothing new QUITE ready for prime time!  

Here's what is going to the Blogger's Quilt Festival from Quilting Bias:


These are going into the Original Design category.


These 2 are going into the Modern Quilt category:


This particular quilt is my version of Jacquie Gering's Shattered quilt, without the borders and done in non-monochromatic way.  It was fun to create and is a springboard for really thinking improvisationally while not feeling boxed into re-creating someone else's work exactly as they originally did.

What inspires you and keeps you creating? 
 Please share with us in the comments.
  
Think about entering this non-judged festival!!  

If nothing else head over there to get a HUGE dose of quilty inspiration from this year as well as past year's entries.  
Thanks to Amy for thinking of and producing such an event!


Thursday, October 23, 2014

New Version of MODERN GEESE

I absolutely 
HAD 
to share this wonderful version of the Modern Geese quilt, 
made by Dianne C., in my recent class.  
I thought it would give some of you inspiration who have bought the pattern if you are considering a different colorway than I showed.
I LOVE her color choices as well as how she enlarged it and made it her own by changing the pattern.


I cannot wait to see it completed.
Great job, Dianne!
Wednesday, October 22, 2014

Half-Square Triangles - How Important Are They In YOUR Quilting Life?

If you are an experienced quilter I would bet you haven't thought a lot lately about the significance of a half-square triangle in your quilting life. 
But, now that I am making you confront it - what do you think about them?  
The half-square triangle is a fundamental building block in quilt-making and can be the basis for some pretty interesting effects and patterns.


I am currently making a quilt using ONLY HSTs 
(Half Square Triangle) to be the sample for an upcoming beginner quilting class I will be teaching soon.  
Sometimes after quilting for awhile it is a good idea to get back to basics and refine and revisit those beginning skills, getting back in touch with your own personal roots of quilting!  
The very first quilting class I ever took was about quilt stitching - like Stitch in the Ditch.  The directions were to come to class with some 9 patch quilt sandwiches. 

HUH?  
Where to begin?  
How do you cut the squares?  
How large are the seams? 


I had to research a nine-patch block and kind of guess what a (quilt) sandwich was.  


Sometimes we forget to assume nothing.  

I love encouraging new quilters.  
It is so rewarding to see the journey they embark upon often progressing rapidly with new-found skills eagerly searching out more and more challenges.


Last night at our local Modern Quilt Guild meeting 
we began the process of  creating our 


Our VP in charge of this, Jennifer M. spent a LOT of time creating a pattern for us that could be contributed to by sewists of differing experience levels, 
BUT - based on a HST!  
I am excited to see the enthusiasm everyone is showing to help make such an important quilt for us at the AMQG - our first group charity quilt!


HSTs can be used to create so many wonderful designs.  Check out Pinterest to see some: http://www.pinterest.com/pin/507429082989199138/


And there are MANY more!

Do you have any HST projects to share?  We would LOVE to see them!

This post linked up with http://sewfreshquilts.blogspot.com/
Tuesday, October 14, 2014

Pink Sun Rising Quilt-Along Part 1: Today - We PAPER-PIECE!!

Let's jump right in!!

Today we will work on the arcs that are the rays of the suns.


1. Pattern:
 Trim the section B arc - don't worry about precision it will get trimmed down as you go.  Do be sure to trim on or outside the CUTTING LINE, outside the stitching line!


This is what it ought to look like - this just gets the bulk out of the way.


2.  Fabrics:

You need 1 color or grouping for the rays and 1 color for the background. This will be the background for the entire quilt, so it is best to use something with a very small pattern or solid.  Be sure to keep color value in mind - you want those rays to really POP!


I used batiks from a jelly roll for my rays. Jellyrolls luckily are precut into 2.5 inch widths.  This turns out to be a great width for both the background & rays. A 5.5 inch length works well for both ray & background fabrics.


If you notice the widest area you have to cover with fabric it is always important to remember that not only do you need the 1/4 inch seam allowance on each side of it, you also have to account for the folding over of the fabric when you paper-piece.


             You will see what I mean as we proceed!


3.  Prepare your machine:

Set the stitch length to about 1/2 of what you normally would use.  I went from 2.5 to 1.5 or even a little less.  
This placement of holes so close together creates a good perforation for removing the paper after you are done.  If you use paper-piecing paper it tears away more easily as it is lighter than regular copy paper.  Copy paper does increase the chances of ripping your stitches out so do be careful!  Some people also suggest you increase the needle size - I haven't found that to be significant but - each to his own!

This close stitching does set up a small issue if you need to rip out your seam.  Paper rips, stitches are hard to see and get at; not good.  If you go slowly and are careful to have fabric cuts large enough to cover your pattern you should be fine.


4.  Stitching

I am skipping ahead a little here with the photos to better orient you.  If you look closely at this photo you might see that you have 2 pieces of fabric and the pattern on top.  On the very bottom is the fabric for the ray (#2) then on top of that - the background fabric (#1), then on the top, the paper.  


Now let's backup to a point before getting here..


Take the pattern and crease along the line between 1 and 2 folding right sides together.  
I really like to use the BACK of a seam ripper - it scores without puncturing the paper if you are CAREFUL!  This creates a nice sharp crease to orient your fabric edge along.


Take 2 strips of fabric:
1 background and 1 ray fabric.

They are right sides together, with the wrong side of the background fabric on top.


Here:
- the folded paper with the #1 triangle underneath,
          is on top of the 2 pieces from above.

- the fold is 1/4 inch away from the edge.

Got that?

Check it and be sure you do!  :)


CAREFULLY open the folded paper so the right side of the pattern is up and you still have the stitching line 1/4 inch from the edge of the stacked fabric pieces,

which again,

          brings you to this:

Stitch along the line as shown.  
It is important to stitch just over the intersecting stitching line at the top and bottom, but not more than a stitch or two.


Press the fabrics flat on the back of the pattern.


At this point you can see how the right side of the arc you are sewing is on the back of the pattern. Remembering this will help you to recall how the first strip of fabric is placed right side down and all the others are right sides up, to the back of the pattern piece, when you are stitching them together.


Now crease the line between rays 2 & 3 like you did between 1& 2 previously.

Using the Add A Quarter Inch Ruler or a quilting ruler cut the fabric away 1/4 inch away from the folded edge of the paper.
This is your new seam allowance for the next seam.


 Add a strip of background fabric, right sides together with the colored fabric, aligning with the cut you just made,


Stitch along the line between 2 & 3.


Fold back over, press and it should look like this!  I did trim the outer and inner curves so you can see the progression.


So - now you continue the steps and complete the arc!

1 down - 

                                                            now sew 14 more!!!


  NO problem- right?

Please leave a comment or email me with any questions or comments.

We will get together again and make these arcs into blocks!!  

In one month on November 12 let's check-in.

Curved seam sewing ahead...