Pages

Wednesday, October 29, 2014

Blogging - SO Much to Learn Part 2

This is EXACTLY what I mean about so much to learn.  Bear with me - I have to create a separate post for each submitted quilt to the Blogger's Quilt Festival.

You have to get beyond this post,

to post #3,

then post #4 

to 

POST #1 
from today
to understand what I am talking about!!

Are you still with me?

Sorry.

  Modern Geese

- Original Design entry #1

my original blog post about this quilt is here:
http://quiltingbias.blogspot.com/2014/08/what-goes-aroundwellyou-know.html


Blogging - SO Much to Learn - Part 3

Sometimes learning is ALL about fixing your errors and living with them!
Here is my submission #3 to the Blogger's Quilt Festival, 1 of 2 to the modern quilting
category.

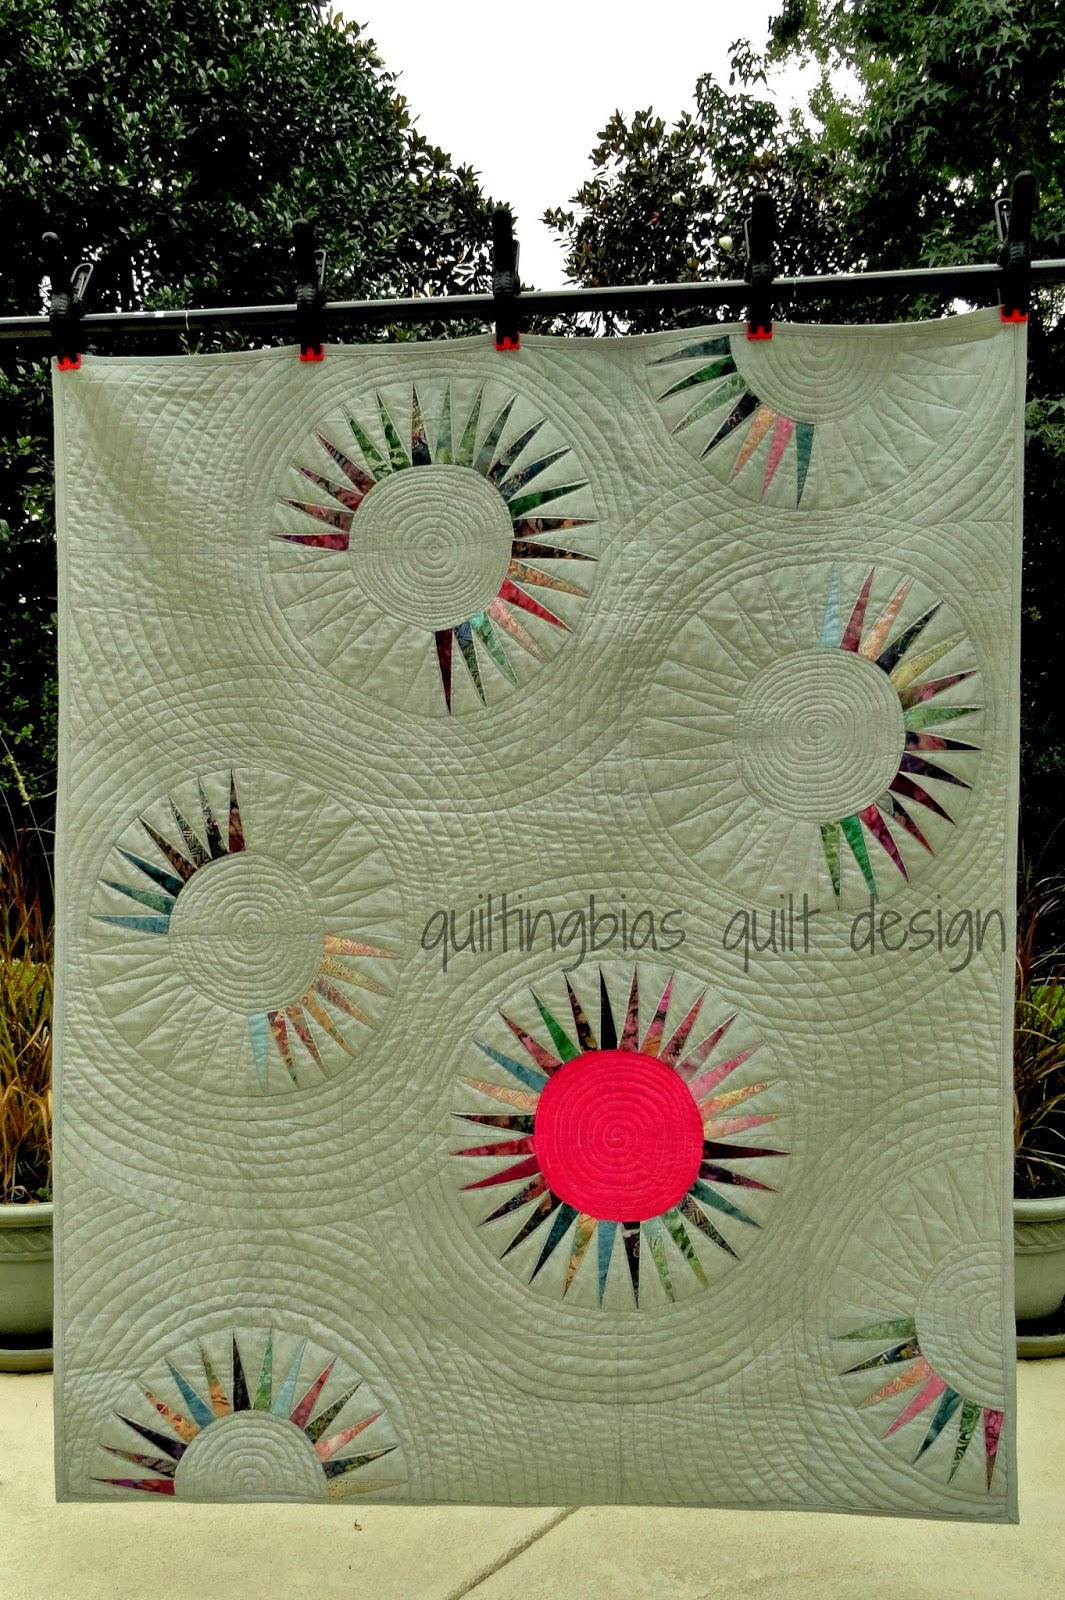
PINK SUN RISING
my modern original version of a New York Beauty quilt

You can read all about this quilt here:
http://quiltingbias.blogspot.com/2014/09/gotta-do-it-my-way.html


http://amyscreativeside.com/2014/10/24/bloggers-quilt-festival-modern-quilts-2/

Blogging - SO MUCH To Learn - Part 4

In this FINAL installment of my submissions to the Blogger's Quilt Festival this is 
JAGGED EDGES
an original design.


Modern?  
By all means, 
BUT definitely an original design as evidenced by the number of HOURS I wasted  invested designing this pattern.
It is made up of only 2 different pieced blocks and created, for me, an edgy modern impactful design.  I designed this particular quilt with EQ7, compared to Modern Geese which I drew on graph paper then tried to retrofit it into software.  NOT an advisable approach, but, it did eventually work.


http://amyscreativeside.com/2014/10/24/bloggers-quilt-festival-fall-2014-edition/


BLOGGING - So Much To Learn!

Hi all!
This morning as I think about this blog and all of you who have chosen to spend your valuable time sharing with me what I am doing - I really am humbled.  

Thank you 
for being here 
and 
REALLY thank you 
for being an inspiration to me to keep exploring my creative side. 

 In my life that depended on my education I taught high school biology and chemistry, so working in this way with fabric and color feels truly indulgent.  I LOVE seeing what everyone else is up to and what keeps you inspired and creatively fueled.  We all know how easy it is to put this area of our life on the back burner while taking care of all those pesky day-to-day necessities.

I recently discovered the Blogger's Quilt Festival at Amy's Creative Side.  If you aren't aware of it - hop on over and have a look at all the creativity here!  

Maybe you have something you'd like to share as well!

I am going to enter quilts that you have seen before,
 if this isn't your first time here.  
Alas I have nothing new QUITE ready for prime time!  

Here's what is going to the Blogger's Quilt Festival from Quilting Bias:


These are going into the Original Design category.


These 2 are going into the Modern Quilt category:


This particular quilt is my version of Jacquie Gering's Shattered quilt, without the borders and done in non-monochromatic way.  It was fun to create and is a springboard for really thinking improvisationally while not feeling boxed into re-creating someone else's work exactly as they originally did.

What inspires you and keeps you creating? 
 Please share with us in the comments.
  
Think about entering this non-judged festival!!  

If nothing else head over there to get a HUGE dose of quilty inspiration from this year as well as past year's entries.  
Thanks to Amy for thinking of and producing such an event!


Thursday, October 23, 2014

New Version of MODERN GEESE

I absolutely 
HAD 
to share this wonderful version of the Modern Geese quilt, 
made by Dianne C., in my recent class.  
I thought it would give some of you inspiration who have bought the pattern if you are considering a different colorway than I showed.
I LOVE her color choices as well as how she enlarged it and made it her own by changing the pattern.


I cannot wait to see it completed.
Great job, Dianne!
Wednesday, October 22, 2014

Half-Square Triangles - How Important Are They In YOUR Quilting Life?

If you are an experienced quilter I would bet you haven't thought a lot lately about the significance of a half-square triangle in your quilting life. 
But, now that I am making you confront it - what do you think about them?  
The half-square triangle is a fundamental building block in quilt-making and can be the basis for some pretty interesting effects and patterns.


I am currently making a quilt using ONLY HSTs 
(Half Square Triangle) to be the sample for an upcoming beginner quilting class I will be teaching soon.  
Sometimes after quilting for awhile it is a good idea to get back to basics and refine and revisit those beginning skills, getting back in touch with your own personal roots of quilting!  
The very first quilting class I ever took was about quilt stitching - like Stitch in the Ditch.  The directions were to come to class with some 9 patch quilt sandwiches. 

HUH?  
Where to begin?  
How do you cut the squares?  
How large are the seams? 


I had to research a nine-patch block and kind of guess what a (quilt) sandwich was.  


Sometimes we forget to assume nothing.  

I love encouraging new quilters.  
It is so rewarding to see the journey they embark upon often progressing rapidly with new-found skills eagerly searching out more and more challenges.


Last night at our local Modern Quilt Guild meeting 
we began the process of  creating our 


Our VP in charge of this, Jennifer M. spent a LOT of time creating a pattern for us that could be contributed to by sewists of differing experience levels, 
BUT - based on a HST!  
I am excited to see the enthusiasm everyone is showing to help make such an important quilt for us at the AMQG - our first group charity quilt!


HSTs can be used to create so many wonderful designs.  Check out Pinterest to see some: http://www.pinterest.com/pin/507429082989199138/


And there are MANY more!

Do you have any HST projects to share?  We would LOVE to see them!

This post linked up with http://sewfreshquilts.blogspot.com/
Tuesday, October 14, 2014

Pink Sun Rising Quilt-Along Part 1: Today - We PAPER-PIECE!!

Let's jump right in!!

Today we will work on the arcs that are the rays of the suns.


1. Pattern:
 Trim the section B arc - don't worry about precision it will get trimmed down as you go.  Do be sure to trim on or outside the CUTTING LINE, outside the stitching line!


This is what it ought to look like - this just gets the bulk out of the way.


2.  Fabrics:

You need 1 color or grouping for the rays and 1 color for the background. This will be the background for the entire quilt, so it is best to use something with a very small pattern or solid.  Be sure to keep color value in mind - you want those rays to really POP!


I used batiks from a jelly roll for my rays. Jellyrolls luckily are precut into 2.5 inch widths.  This turns out to be a great width for both the background & rays. A 5.5 inch length works well for both ray & background fabrics.


If you notice the widest area you have to cover with fabric it is always important to remember that not only do you need the 1/4 inch seam allowance on each side of it, you also have to account for the folding over of the fabric when you paper-piece.


             You will see what I mean as we proceed!


3.  Prepare your machine:

Set the stitch length to about 1/2 of what you normally would use.  I went from 2.5 to 1.5 or even a little less.  
This placement of holes so close together creates a good perforation for removing the paper after you are done.  If you use paper-piecing paper it tears away more easily as it is lighter than regular copy paper.  Copy paper does increase the chances of ripping your stitches out so do be careful!  Some people also suggest you increase the needle size - I haven't found that to be significant but - each to his own!

This close stitching does set up a small issue if you need to rip out your seam.  Paper rips, stitches are hard to see and get at; not good.  If you go slowly and are careful to have fabric cuts large enough to cover your pattern you should be fine.


4.  Stitching

I am skipping ahead a little here with the photos to better orient you.  If you look closely at this photo you might see that you have 2 pieces of fabric and the pattern on top.  On the very bottom is the fabric for the ray (#2) then on top of that - the background fabric (#1), then on the top, the paper.  


Now let's backup to a point before getting here..


Take the pattern and crease along the line between 1 and 2 folding right sides together.  
I really like to use the BACK of a seam ripper - it scores without puncturing the paper if you are CAREFUL!  This creates a nice sharp crease to orient your fabric edge along.


Take 2 strips of fabric:
1 background and 1 ray fabric.

They are right sides together, with the wrong side of the background fabric on top.


Here:
- the folded paper with the #1 triangle underneath,
          is on top of the 2 pieces from above.

- the fold is 1/4 inch away from the edge.

Got that?

Check it and be sure you do!  :)


CAREFULLY open the folded paper so the right side of the pattern is up and you still have the stitching line 1/4 inch from the edge of the stacked fabric pieces,

which again,

          brings you to this:

Stitch along the line as shown.  
It is important to stitch just over the intersecting stitching line at the top and bottom, but not more than a stitch or two.


Press the fabrics flat on the back of the pattern.


At this point you can see how the right side of the arc you are sewing is on the back of the pattern. Remembering this will help you to recall how the first strip of fabric is placed right side down and all the others are right sides up, to the back of the pattern piece, when you are stitching them together.


Now crease the line between rays 2 & 3 like you did between 1& 2 previously.

Using the Add A Quarter Inch Ruler or a quilting ruler cut the fabric away 1/4 inch away from the folded edge of the paper.
This is your new seam allowance for the next seam.


 Add a strip of background fabric, right sides together with the colored fabric, aligning with the cut you just made,


Stitch along the line between 2 & 3.


Fold back over, press and it should look like this!  I did trim the outer and inner curves so you can see the progression.


So - now you continue the steps and complete the arc!

1 down - 

                                                            now sew 14 more!!!


  NO problem- right?

Please leave a comment or email me with any questions or comments.

We will get together again and make these arcs into blocks!!  

In one month on November 12 let's check-in.

Curved seam sewing ahead...


Monday, October 13, 2014

Gathering Supplies....

Are YOU getting ready?


If you have ANY questions please leave them in the comments or email me at 
quiltingbias@gmail.com

See YOU on Wednesday to Quilt-Along with Pink Sun Rising!
Thursday, October 2, 2014

Pink Sun Rising QUILT-ALONG

Thank-you for all the enthusiasm and sweet comments about doing a Quilt-Along of this paper-pieced project!  
PINK SUN RISING
by QUILTING BIAS
QUILT DESIGNS

Is it difficult?  

In the realm of paper-piecing I would say NO because the paper-piecing component of this design is really only comprised of non-intersecting seams 

- you know -

NO dreaded Y - seams!

like these:
design wall view of my current project!!


Now,
it does have curved piecing 

- but with a few challenges

we can all feel accomplished after tackling a new skill-set or
just further exploring one we have already delved into.


Some of you lovely followers had some other concerns - VERY busy right now, could we get a discount on the pattern, etc.

This Quilt-Along will be up on the blog in perpetuity so jump in when it works best for you!  

Instead of a discounted initial purchase what I thought might be 
FUN 
(and isn't that what this is all about???)
would be to offer a discount on any further pattern purchase of any one QUILTING BIAS Quilt Design pattern if you send me a photo of your finished quilt top or even possibly (GASP) the completed quilt which I will share on the blog.  I thought that might be a LITTLE more incentive to GET IT DONE than giving it away up front.  (add wink here!!)

SHALL WE GET STARTED?

STEP 1:  
GATHER your materials.

WHAT DO WE NEED?

a..  The PATTERN!  
This can be mailed to you in printed format or you can get an immediate PDF download.  All the resources for this are at the top of the blog.  Craftsy ONLY supports downloads, Big Cartel or Etsy support both.  If you would prefer not to access any of these on-line sources I can invoice you directly through PayPal as well.


b.  Notions:
Basic quilting supplies you enjoy using - you know - rotary cutter, mat, quilting rulers, good quality pins, scissors (paper AND fabric) etc.

ALSO:

i.  The one specialty item that will come in handy is an Add A Quarter Ruler.  
It is not ABSOLUTELY necessary but is handy.  
You can use a quilting ruler with a 1/4 inch demarcation on it alternatively but the Add A Quarter snugs right up to the seam you are cutting next to so does help avoid slippage.

ii.  Another choice is in the paper you use for printing the pattern onto.  
The pattern has 1 of each of the component parts of the blocks - you will have to print these for each block.  Printer paper or specialty paper-piecing paper is an individual choice.  Personally I use both.  Paper specially designed  for paper-piecing is lighter weight and tears away more easily than printer paper.  If you use printer paper it will require a little more care in removing it - but it is done successfully all the time.

iii.  Freezer paper.


c.  Fabric
Yardage is listed in the pattern.  
A word to the wise - it is always prudent to think ahead a little about binding and backing if you want it to coordinate or match any other fabric you are using.  Have you ever been disappointed when, having completed a quilt top then trying to find THAT special fabric again to no avail??  GRRRR.....


So...

are you READY???


Let's get our heads and supplies together and meet back here in about 2 weeks:

on OCTOBER 15 

and we will BEGIN!

I am EXCITED to do this with you!

Please leave any questions or concerns in the comments or email me at quiltingbias@gmail.com.